
Introduction
In the rapidly evolving world of Data Science and Machine Learning, we need software which is fast, accessible at the tip of our hand and simple to use. This becomes more important for the people who are beginners. Thankfully, in today's world of the internet, we have some amazing tools and platforms which makes our life easier. One such tool is Google Colab.
What is Google Colab?
When I stepped into the world of machine learning and Data science, the first thing I had to do was a lot of installation. This was quite an overwhelming process since I had to download a huge number of libraries. These libraries would take both time and space on your local machine. Also, many data science and machine learning algorithms need a dedicated GPU to run the programs efficiently
Then I came across a platform called “Google Colab”. Google Colab which stands for Google Colaboratory is a cloud platform provided by Google to run Python Notebook’s without need to install anything on your local machine. Isn’t it cool?
You can use Colab to create Python code in your browser, just as in a Jupyter Notebook, without having to set one up. All you have to do is open the google colab in the browser and you are ready to go.
Features of Google Colab
Google Colab provides a number of benefits that make it a powerful and popular tool for data scientists, machine learning practitioners, and developers. Here is the list of features that it provides.
1. Zero Setup Required
This is the most important feature of Google Colab. It eliminates the need of any software installation and configuration on your local machine. All you have to do is open the web browser, navigate to the Google Colab and you are ready to go.
2. Free GPU Access
Google Colab provides free access to GPU’s which stands for Graphics Processing Units. Sometimes it can also provide access to TPU’s which stands for Tensor Processing Units. GPU’s are essential for running computationally intensive tasks faster. Many ML algorithms like deep learning models need GPUs to run efficiently. This access to strong hardware resources can considerably accelerate your data processing and machine learning processes at no additional expense.
3. Easy Collaboration
Google Colab makes it very easy to collaborate with your team members. You can quickly share your notebook's with your colleagues, allowing them to see, comment on, and even make changes in real time. As a result, many users can work on the same notebook at the same time, making it an ideal platform for team projects, coding interviews, or instructional purposes.
4. Pre-installed Libraries
Google Colab provides a collection of pre-installed libraries. These libraries include some of the essential data science and machine learning libraries like NumPy, Pandas, TensorFlow, PyTorch, etc. Because of this, you don't have to worry about installing and managing these libraries manually. This is very time saving feature which allows you to focus on your work rather than setup and configuration.
5. Version Control and Integration
Notebook's created in Google Colab can be easily integrated with the GIT version control system. This makes it easier for you to track your changes, collaborate with team members on your projects and maintain the history of your changes in the notebook. Additionally, you can integrate Google Colab with Google Drive which acts as a cloud-based storage for your notebooks and datasets. With this integration, your changes in the notebook are automatically saved and are easily accessible from any device which has an internet connection.
How to Use Google Colab?
To use google colab effectively, let's look at the step by step guide to use Google Colab.
Accessing Google Colab
Open your web browser and go to Google Colab at https://colab.research.google.com/. Sign in with your Google account if you're not already logged in.
Creating a New Notebook
Click on the "File" menu, then select "New Notebook" to create a new Python 3 notebook. You can rename your notebook by clicking on the current name at the top and entering a new one.
Working with Cells
Cell's are the building blocks of the Notebook. Google Colab notebooks also consist of cells. There can be two types of cells.
-
Code cells
-
Text (Markdown) cells.
Code cells are where you write and run your Python code. To add a new code cell, click the "+ Code" button on the top or use keyboard shortcuts (e.g., Ctrl+M B for).

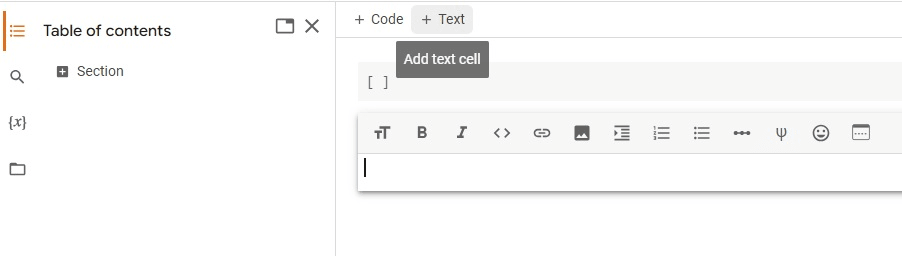
Text (Markdown) cells are used for adding explanations, documentation, or formatted text. To add a new code cell, click the "+ Text" button on the top.
Running Code
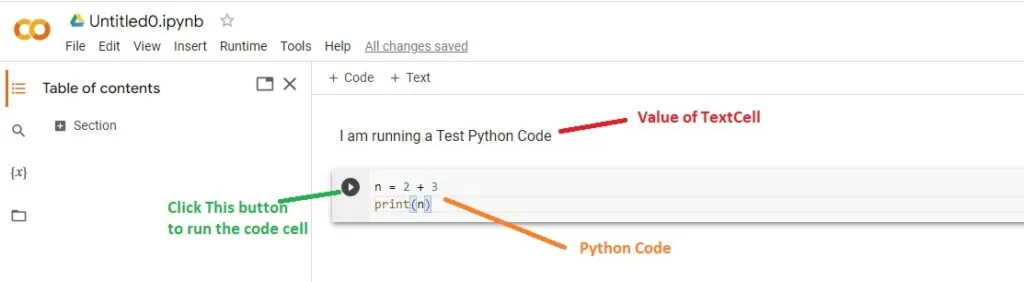
Now let's see, how to execute a code cell once we have added them to the notebook. As you can see below, you need click on the play button to run the code once you have added the python code in the code cell.
After the run is successful, you can see the green tick indicating the code run is successful and also you can see the results below the code cell.
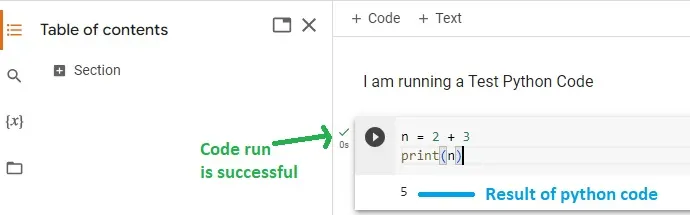
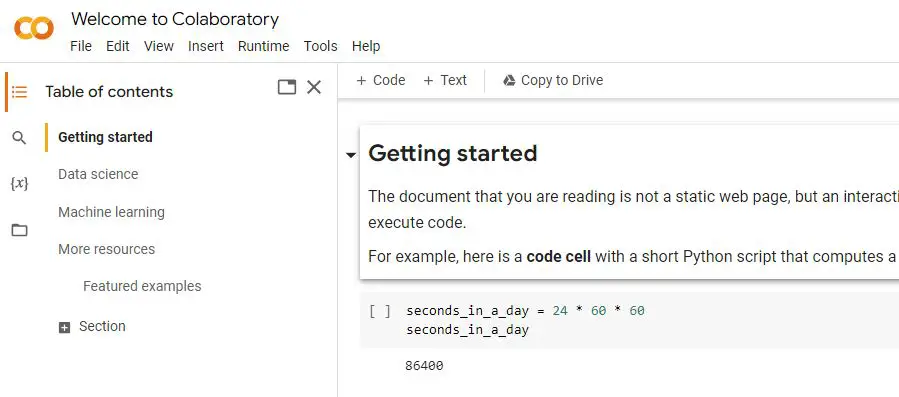
Table of Contents
Google colab allows you to use sections in the notebooks. This allows you to organize your notebook into distinct sections which makes it easier to navigate and scroll through as it grows in size. This can be particularly helpful when working with long or complex notebooks.
Managing Notebooks
Save your work by clicking "File" > "Save" or use Ctrl+S (Cmd+S on Mac). You can organize your notebooks into folders on Google Drive by clicking "File" > "Save a copy in Drive."
Using GPU/TPU
To utilize Google Colab's free GPU or TPU resources, go to "Runtime" > "Change runtime type" and select "GPU" or "TPU" as the hardware accelerator. Note that GPU/TPU resources are allocated per session and may have usage limits.
Collaboration
Share your notebook with collaborators by clicking "Share" in the upper right corner. You can grant various access levels, such as viewing, commenting, or editing permissions.
Importing Libraries
To import libraries that are not present, simply run the below commands followed by the library name, Libraries will get installed in the notebook virtual environment without taking up any space on your local machine.
!pip install <LIBRARY_NAME>
Conclusion
In this blog, you saw the list of features provided by Google Colab. It provides such a user-friendly interface which is combined with its powerful features. This makes it a very useful tool for data scientist's as well as the developers. It allows working with Python and Jupyter notebooks, enables smooth collaboration, and provides access to GPU and TPU resources in a cloud-based environment.
Thank you for taking the time to read this blog post. We hope that you found the information provided in the blog to be helpful and informative. For similar content, please check out our other blogs.
We appreciate your support and feedback, and we would love to hear from you if you have any questions or comments about the blog. If you have any specific topic you want us to cover in the future, please feel free to let us know.