
Authentication is a critical aspect of any web application. Authentication ensures that only authorized users are able to access specific resources and perform certain actions in your application. In this blog post, we will understand the concept of Authentication in .NET Core. We'll also look at the summary of different types of authentication available in .NET Core. We'll also discuss in detail how to configure and use the JWT Authentication methods in a .NET Core application. Whether you're new to .NET Core or have been working with it for a while, this blog post will provide you with a solid understanding of how to implement JWT Authentication in a .NET Core application.
What is Authentication?
In web applications, Authentication is the process of verifying the identity of a user. It ensures that only authorized users are able to access specific resources and perform certain actions. The goal of authentication is to verify that a user is who they claim to be, and not an imposter.
When a user attempts to access a protected resource in a web application, the application will typically prompt the user to enter their credentials, such as a username and password. The application will then validate these credentials against a user store, such as a database of registered users. If the credentials are valid, the application will grant the user access to the protected resource. If the credentials are invalid, the application will deny access and may prompt the user to try again.
Authentication can also be done using tokens, such as JSON Web Tokens (JWT), which are issued to the user after they have successfully authenticated. These tokens can be used to authenticate the user on subsequent requests to the application, without requiring the user to enter their credentials again.
Types of Authentication
There are different types of Authentication provided by .NET Core. Here are a few of the most commonly used Authentication types and techniques -
JSON Web Tokens (JWT) Authentication
JWT is a popular authentication technique in .NET applications. Instead of storing the user's credentials on the client's browser, a JWT is issued to the client after the user has successfully authenticated. The JWT contains a payload, which can include the user's identity and other claims. The client can then include the JWT in the Authorization header of subsequent requests to the server, which can use the JWT to verify the user's identity.
Cookie-based Authentication
Cookie-based authentication is the most common form of authentication used in web applications. It involves storing a user's credentials (usually in the form of a session cookie) on the client's browser, which is then sent back to the server with each subsequent request. This allows the server to verify the user's identity without requiring them to enter their credentials each time.
OAuth 2.0 Authentication
OAuth 2.0 is an open standard for authorization that is widely used in web applications. It allows users to grant third-party applications access to their resources (such as their Google account) without sharing their credentials. In .NET Core, Microsoft.AspNetCore.Authentication.OAuth package provides support for working with OAuth 2.0.
Some other types of authentication which are supported by .NET Core are OpenID Connect, Identity Server, and Windows Authentication.
What is JWT?
-
JWT is an abbreviation for JSON Web Tokens.
-
JWT authentication is a popular way to authenticate users in an ASP.NET application.
-
It allows the server to issue a token to the client after the user has successfully authenticated.
-
The client can then include the token in the Authorization header of subsequent requests to the server, which can use the token to verify the user's identity.
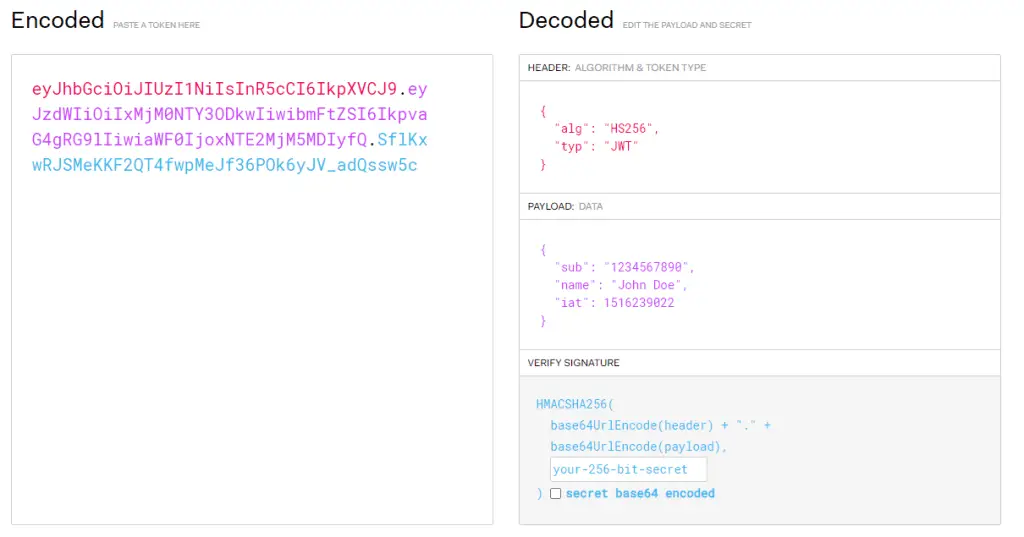
Format of JWT Tokens
JWT (JSON Web Token) is a compact, URL-safe way of representing claims to be transferred between two parties. JWT tokens are composed of three parts, which are separated by dots (.). These parts are -
Header - This contains information about how the JWT is encoded. It typically consists of two parts: the type of the token, which is JWT, and the signing algorithm being used, such as HMAC SHA256 or RSA. It is encoded in base64 format.
{
  "alg": "HS256",
  "typ": "JWT"
}
Payload - This contains the claims. Claims are statements about an entity (typically, the user) and additional metadata. There are three types of claims: registered, public, and private claims.
{
  "sub": "1234567890",
  "name": "John Doe",
  "iat": 1516239022
}
Signature - This is used to verify that the sender of the JWT is who it says it is and to ensure that the message wasn't changed along the way. The signature is created using the header and payload, a secret key, and the algorithm specified in the header.
Example -
HMACSHA256(
  base64UrlEncode(header) + "." +
  base64UrlEncode(payload),
  secret)
The three parts are concatenated with dots (.) and the resulting string is the JWT token -
eyJhbGciOiJIUzI1NiIsInR5cCI6IkpXVCJ9.eyJzdWIiOiIxMjM0NTY3ODkwIiwibmFtZSI6IkpvaG4gRG9lIiwiaWF0IjoxNTE2MjM5MDIyfQ.SflKxwRJSMeKKF2QT4fwpMeJf36PO
JWT Token Generation Process
Here is the overview of the token generation process -
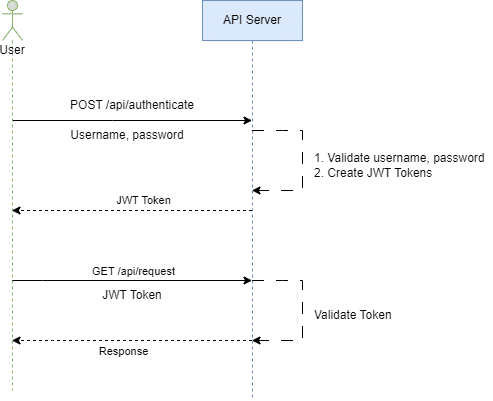
As you can see in the above diagram, the request flow happens as below -
-
The user makes a login request to the API server by passing a username and password to it.
-
Once the request is received, the API server validates the credentials from the data store like a database.
-
If credentials are invalid, it returns an error to the user. If the credentials are valid, a JWT token is generated by the API server and returned to the user.
-
The client stores the JWT and includes it in the Authorization header of subsequent requests to the server.
-
The server can use the JWT to verify the user's identity and grant or deny access to specific resources.
Decoding JWT Tokens
If you have received a JWT Token, you can also decode it given you have the secret key available with you. To decode you can use the online tool https://jwt.io/. In this tool, on the left side, you can add the JWT token and on the right, it will decode the token in the parts explained earlier.
Implement JWT in ASP.NET
Since we have covered the theoretical part, let's see the steps to implement JWT in ASP.NET projects.
Prerequisites
Before we start you have the below prerequisites installed.
-
Visual Studio - We will be using Visual Studio for this tutorial. So make sure you have it. If not you can follow the installation guide here.
-
.NET CLI with Visual Studio Code - You can also use .NET CLI and use Visual Studio Code instead. To install it, follow the installation guide here.
Step 1 - Create a new ASP.NET Core Web API Project
Create a new ASP.NET Core Web API. We have named the project JWTAuthenticationTutorial, but you can provide the name of your choice.

Step 2 - Install Necessary NuGet Packages
To implement JWT Token based authentication, we need to install two packages -
-
Microsoft.AspNetCore.Authentication.JwtBearer
-
System.IdentityModel.Tokens.Jwt
Let's install these packages either from NuGet Package Manager or run the below commands from Package Manager Console.
PM> Install-Package Microsoft.AspNetCore.Authentication.JwtBearer

PM> Install-Package System.IdentityModel.Tokens.Jwt
Step 3 - Update AppSettings.json
As explained in the above sections, there are a few things needed to generate a JWT Token like Key, Issuer, and Audience. We will be reading these values from AppSettings.json. Open appsettings.json and add the below values to it.
{
  "Logging": {
    "LogLevel": {
      "Default": "Information",
      "Microsoft.AspNetCore": "Warning"
    }
  },
  "AllowedHosts": "*",
  "JWT": {
    "Key": "<Add_Secret_Key_Here>",
    "Issuer": "https://test.com", //Add correct Issuer here as per need
    "Audience": "TEST"
  }
}
Step 4 - Configure JWT
In the application start, we need to enable Authentication using JWT. If you are using .NET 5 or a lower version, add the below code in Startup.cs file, else add the code in Program.cs file.
builder.Services.AddAuthentication(x =>
{
    x.DefaultAuthenticateScheme = JwtBearerDefaults.AuthenticationScheme;
    x.DefaultChallengeScheme = JwtBearerDefaults.AuthenticationScheme;
}).AddJwtBearer(o =>
{
    var Key = Encoding.UTF8.GetBytes(builder.Configuration["JWT:Key"]);
    o.SaveToken = true;
    o.TokenValidationParameters = new TokenValidationParameters
    {
        ValidateIssuer = false,
        ValidateAudience = false,
        ValidateLifetime = true,
        ValidateIssuerSigningKey = true,
        ValidIssuer = builder.Configuration["JWT:Issuer"],
        ValidAudience = builder.Configuration["JWT:Audience"],
        IssuerSigningKey = new SymmetricSecurityKey(Key)
    };
});
.
.
.
var app = builder.Build();
.
.
.
app.UseAuthentication(); //Don't forget to add this line

app.UseAuthorization();
Here we are enabling authentication in the application by calling the AddAuthentication extension method provided by .NET and informing it to use the Jwt Authentication scheme.
Also, by using builder.Configuration["JWT:Key"], we are reading the secret for JWT from App Settings. Also, we need to add the app.UseAuthentication to enable authentication.
Step 5 - Create a Service to Authenticate Users and Generate Token
First, let's create the required models in the folder named Models. We will be needing two models, one for the User information and one for the Token information once the user is validated.
Create a new file User.cs
namespace JWTAuthenticationTutorial.Models
{
    public class User
    {
        public string Username { get; set; }
        public string Password { get; set; }
    }
}
Create a new file Token.cs
namespace JWTAuthenticationTutorial.Models
{
    public class Token
    {
        public string AuthToken { get; set; }
    }
}
Let's now create a new Interface named IAppAuthService which will provide the contract to authenticate the users.
using JWTAuthenticationTutorial.Models;

namespace JWTAuthenticationTutorial
{
    public interface IAppAuthService
    {
        Task<Token> Authenticate(User user);
    }
}
Let's now add the implementation for this interface in the class named AppAuthService. This class will be doing two things. First, validate the username and password passed as input. Second, generate the JWT Token if validation is successful.
using JWTAuthenticationTutorial.Models;
using Microsoft.IdentityModel.Tokens;
using System.IdentityModel.Tokens.Jwt;
using System.Security.Claims;
using System.Text;

namespace JWTAuthenticationTutorial
{
    public class AppAuthService : IAppAuthService
    {
        private readonly IConfiguration _configuration;

        Dictionary<string, string> TestUsers = new Dictionary<string, string>
        {
            { "test_user_1","password@123"}
        };

        public AppAuthService(IConfiguration configuration)
        {
            _configuration = configuration;
        }

        public async Task<Token> Authenticate(User user)
        {
            if (user == null || string.IsNullOrEmpty(user.Username) || string.IsNullOrEmpty(user.Password))
                throw new Exception("Invalid Input received!");

            if (!TestUsers.ContainsKey(user.Username))
                throw new Exception($"User with name {user.Username} not found!");

            if (user.Password != TestUsers[user.Username])
                throw new Exception("Invalid Password!");

            // User name and password are valid.
            // Generate JSON Web Token

            var tokenHandler = new JwtSecurityTokenHandler();
            var tokenKey = Encoding.UTF8.GetBytes(_configuration["JWT:Key"]);
            var tokenDescriptor = new SecurityTokenDescriptor
            {
                Subject = new ClaimsIdentity(new Claim[]
                {
                    new Claim(ClaimTypes.Name, user.Username)
                }),
                Expires = DateTime.UtcNow.AddHours(1),
                SigningCredentials = new SigningCredentials(new SymmetricSecurityKey(tokenKey), SecurityAlgorithms.HmacSha256Signature)
            };
            var token = tokenHandler.CreateToken(tokenDescriptor);
            return new Token { AuthToken = tokenHandler.WriteToken(token) };
        }
    }
}
Let's see what we are doing here.
-
We are passing IConfiguration to the constructor. We will need it to get information from app settings for generating JWT tokens.
-
In this tutorial, we don't have the database configured for storing User data. Hence we have declared a Dictionary with a static username and password.
-
We have added the validations to check if the username and password match.
-
If the validation is not successful we have thrown errors using Exception.
-
If validation is successful, the token is generated and returned.
Finally, let's register the AppAuthService for dependency injection. Open Startup.cs or Program.cs depending on the version of .NET you are using and add the below code.
builder.Services.AddTransient<IAppAuthService, AppAuthService>();
Step 6 - Create a User Controller
In the Controllers folder, let's add a new controller named as UsersController. Inject IAppAuthService in its constructor.
Let's also add an Action to UsersController named Authenticate. This action will take the user as input. If the User is valid, it will return a 200 OK HTTP Response with the Token Generated. Else it will return HTTP Unauthorized Response.
using JWTAuthenticationTutorial.Models;
using Microsoft.AspNetCore.Mvc;

namespace JWTAuthenticationTutorial.Controllers
{
    [Route("api/[controller]")]
    [ApiController]
    public class UsersController : ControllerBase
    {
        private readonly IAppAuthService _appAuthService;

        public UsersController(IAppAuthService appAuthService)
        {
            _appAuthService = appAuthService;
        }

        [HttpPost]
        [Route("authenticate")]
        public async Task<IActionResult> Authenticate(User user)
        {
            var token = await _appAuthService.Authenticate(user);

            if (token == null)
            {
                return Unauthorized();
            }

            return Ok(token);
        }
    }
}
Step 7 - Test Authentication
Now all the configuration is in place, let's verify if the authentication is working. For verifying if authentication is working, let's use the controller added by the ASP.NET Web API Template named WeatherForecastController. If this controller is not present in your project, add it with the below code.
using Microsoft.AspNetCore.Authorization;
using Microsoft.AspNetCore.Mvc;

namespace JWTAuthenticationTutorial.Controllers
{
    [Authorize]
    [ApiController]
    [Route("[controller]")]
    public class WeatherForecastController : ControllerBase
    {
        private static readonly string[] Summaries = new[]
        {
        "Freezing", "Bracing", "Chilly", "Cool", "Mild", "Warm", "Balmy", "Hot", "Sweltering", "Scorching"
    };

        private readonly ILogger<WeatherForecastController> _logger;

        public WeatherForecastController(ILogger<WeatherForecastController> logger)
        {
            _logger = logger;
        }

        [HttpGet(Name = "GetWeatherForecast")]
        public IEnumerable<WeatherForecast> Get()
        {
            return Enumerable.Range(1, 5).Select(index => new WeatherForecast
            {
                Date = DateTime.Now.AddDays(index),
                TemperatureC = Random.Shared.Next(-20, 55),
                Summary = Summaries[Random.Shared.Next(Summaries.Length)]
            })
            .ToArray();
        }
    }
}
This is a simple controller, which contains a GET action and returns random weather forecast data. Note that, we have added an attribute named Authorize on top of the Controller. This attribute informs .NET that all the calls coming to the actions of this controller should only be made by the authenticated users.
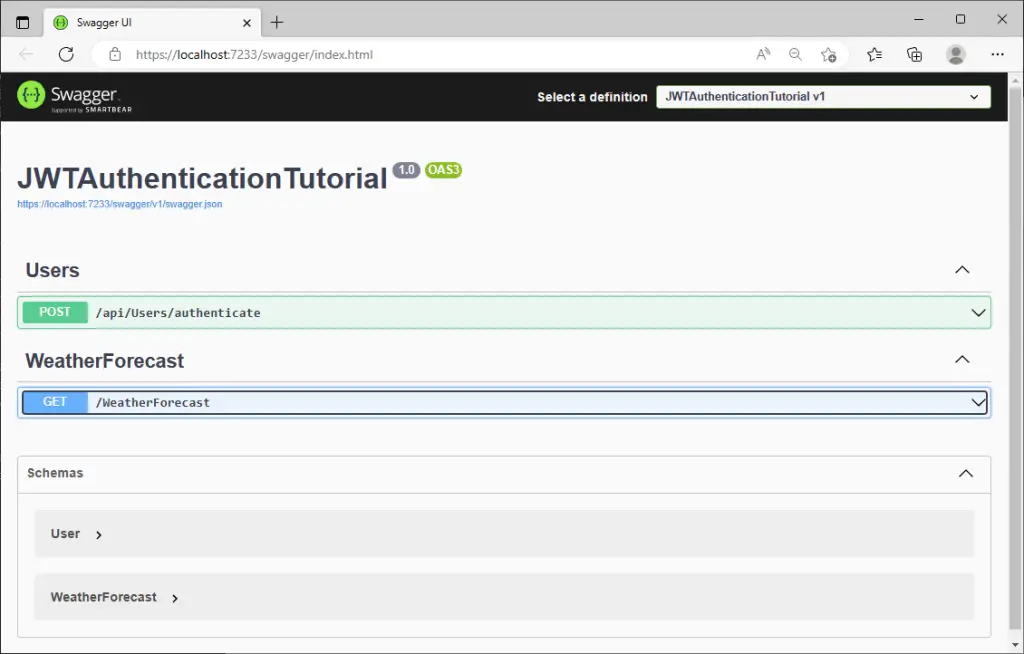
Now let's run the code. You should see the swagger page.
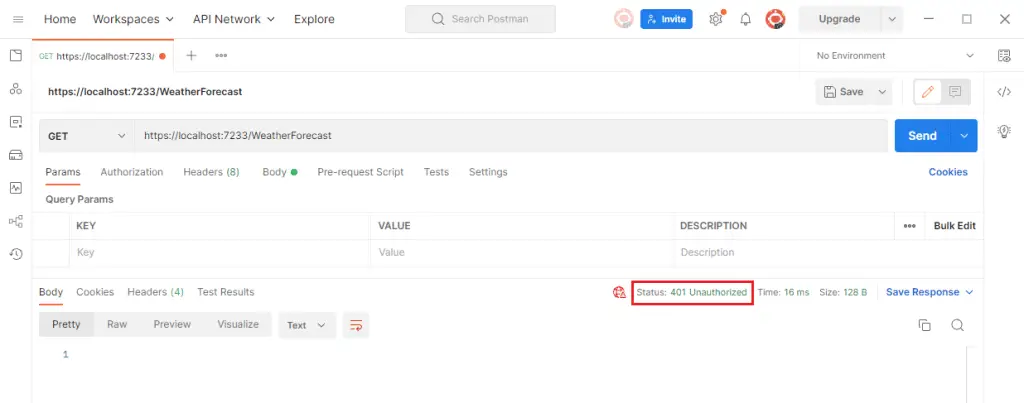
Open postman and try to give the GET call to get WeatherForecast API. And as expected, you should see the response as 401 Unauthorized.
Now let's give the call to the Authenticate endpoint and pass the correct username and password.
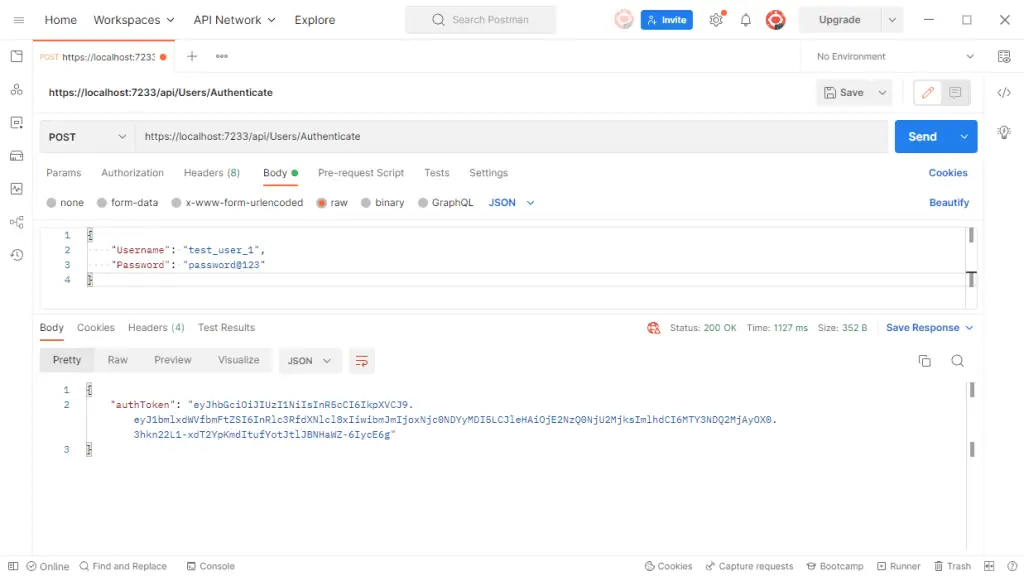
As you can see, we got the response 200 OK and the response body with AuthToken inside it. Now, we can pass this token with the secured APIs. Copy the auth token. In POSTMAN, open the request of GET WeatherForecast, and navigate to Authorization. In the type select Bearer Token. Then on the right pane, paste the Auth Token. Now, give the request again.
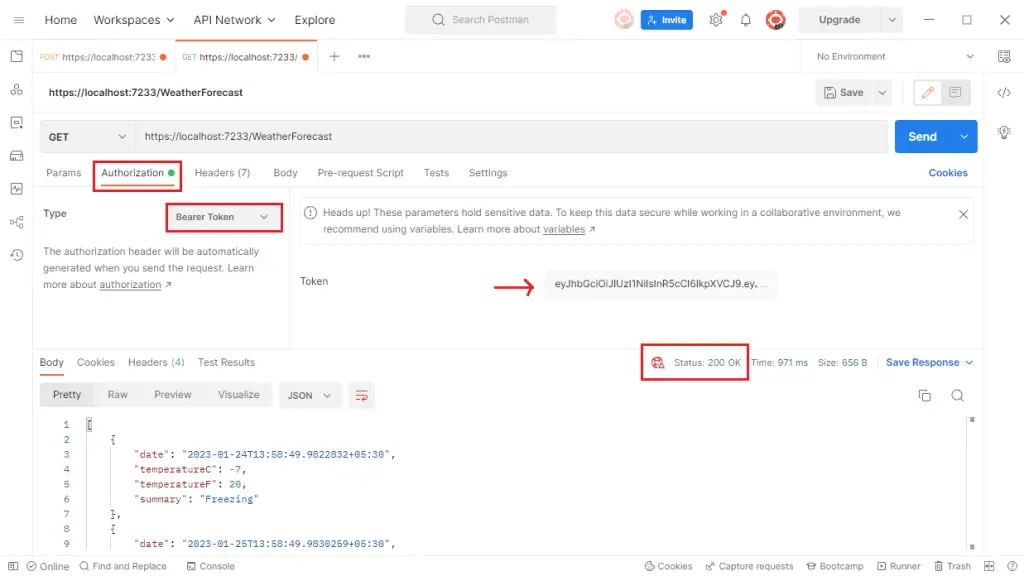
As you can see, once we pass the Auth Token, the API responded with the response 200 OK and returned the weather data successfully.
Code Reference
You can find the code for this blog on GitHub. Feel free to use and build upon the code for your own projects.
Conclusion
In this blog, we understood the importance of Authentication in Web Applications. We also studied the different types of Authentication schemes provided by .NET. Then we studied in detail what is JWT Authentication and how it works. We also explored the detailed step-by-step guide to implement authentication using JWT in the ASP.NET Web API application.
Thank you for taking the time to read this blog post. We hope that you found the information provided in the blog to be helpful and informative. For similar content, please check out our other blogs.
We appreciate your support and feedback, and we would love to hear from you if you have any questions or comments about the blog. If you have any specific topic you want us to cover in the future, please feel free to let us know.
Once again, thank you for reading our blog, and we look forward to your continued support.